Appearance
Connect to WhatsApp
Use this guide to connect a WhatsApp Business Account to rather.chat so your company workspace can use chats, templates, broadcasts, and related messaging features.
Before you start
- Required access: rather.chat admin plus admin access in Meta Business Manager.
- Your rather.chat account and company should already be ready.
- Decide whether you will use an existing number or request a virtual number.
- Review WhatsApp API guidelines and limits if you are planning templates, media, or broadcasts immediately after setup.
- Estimated time: about 10-20 minutes.
If you already use another provider and want to move that number into rather.chat, use Migrate to rather.chat instead.
Setup checklist
- [ ] You can sign in to rather.chat.
- [ ] You know which company workspace should own the connection.
- [ ] You have the required Meta Business Manager access.
- [ ] You know whether you are using an existing number or a new virtual number.
- [ ] You have reviewed any business-policy restrictions that may affect your use case.
Choose your number path
| Situation | Choose |
|---|---|
| You already have a number to connect | Yes |
| You need rather.chat to provision a number | No, please provide one for me |
If you plan to use your own number, it must not already be connected to another WhatsApp account or integration unless you are following the migration guide.
Request a virtual number
If you need a new number:
- Choose your country.
- Click Submit.
- Wait for the number to be generated.
Number generation is usually quick, but it can take a few minutes. Keep the connection page open while the platform prepares the number.
The verification code for the new number is sent to your email address, so keep that inbox open while you complete the connection.
TIP
If the code email does not arrive after a few minutes, check spam or junk mail, confirm you are checking the same email address used during sign-up, and retry the connection step if the platform shows a retry option.
Connect your WhatsApp Business Account
- Click Connect WhatsApp Account.
- Complete the Meta embedded signup prompts.
- Confirm your business assets.
- Confirm the phone number and finish verification.
Meta screens can change over time. Follow the closest matching prompt if the wording differs slightly from the screenshots below.
1. Start the connection
Click Connect WhatsApp Account.
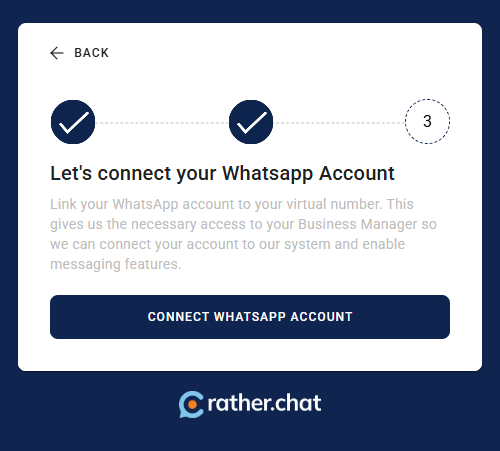
You should now see the Meta connection flow.
2. Log in to Facebook
If Meta prompts you, sign in to Facebook to continue.

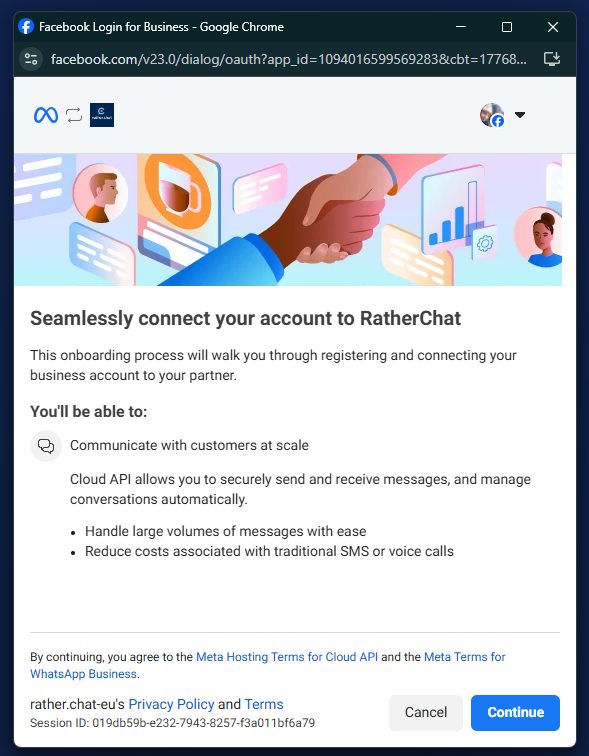
3. Review the rather.chat integration screen
Read the connection overview and click Continue.
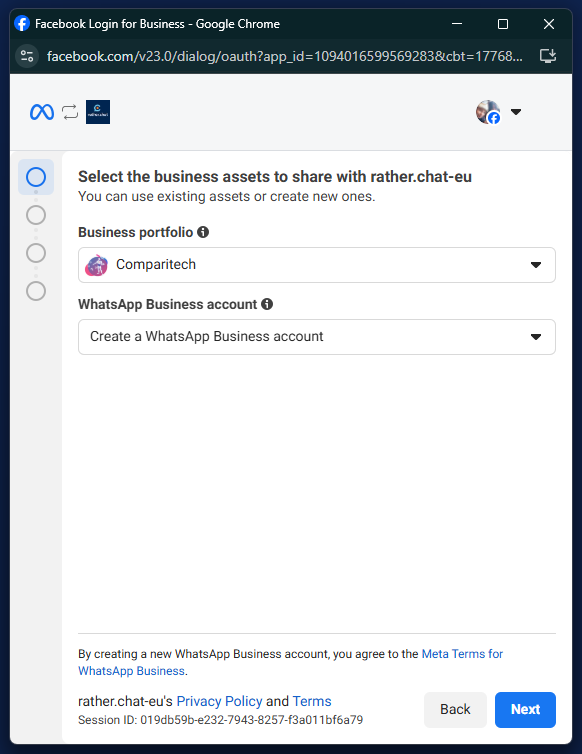
4. Select your business assets
Choose the business portfolio and WhatsApp Business Account that should be connected.
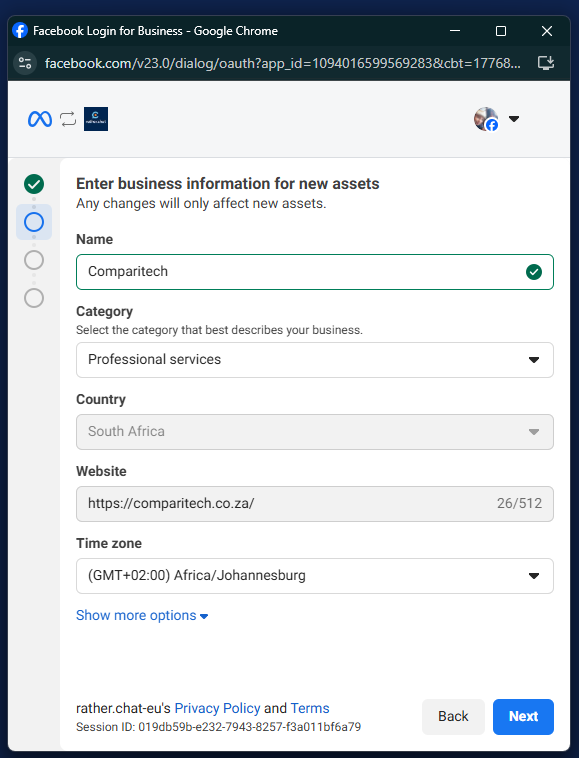
5. Enter your business information
Complete the business details required by Meta, such as business name, category, website, and timezone.
6. Add and verify the phone number
Choose the number option, enter the number details, set the display name, and select how you want to verify the number.
Select Phone call to receive the verification code. rather.chat forwards that code to the email address you used during Sign up.
Once the 6-digit code arrives:
- Enter the code.
- Click Next.
- On the final Meta screen, click Finish.
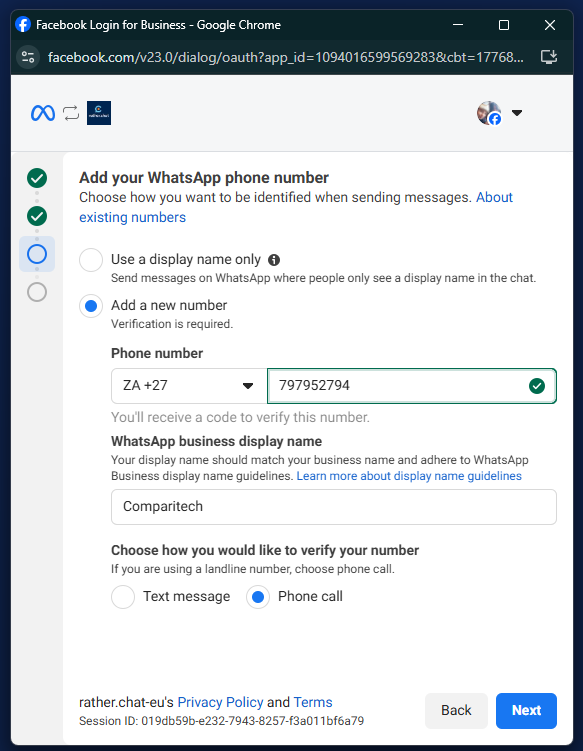
Do not close the browser tab, popup, or embedded Meta window before you click Finish.
WARNING
Verification codes can be delayed by email filtering or temporary Meta delivery delays. Check spam or junk mail before restarting the flow. If more than one email arrives, use the newest code.
Display name guidance
Use a display name that clearly matches your real business identity.
Good display names:
- Match the company or brand name.
- Align with your website and public presence.
- Help customers immediately recognise who is messaging them.
Avoid names that:
- Use only broad category words or location names.
- Include promotional slogans or unnecessary punctuation.
- Suggest official verification when that is not true.
- Use Meta product names in a misleading way.
How to know it worked
- The WhatsApp Business Account is linked to rather.chat.
- Your channels refresh in the dashboard.
- You reach the integration success screen.
- You can proceed to final setup such as attaching a payment method in Meta.
Final setup after success
Attach a payment method to the WhatsApp Business Account so messaging can be activated:
- Open Add Payment Method
- Complete the billing setup in Meta Business Manager.
The success screen may also note that a rather.chat team member can help finalise setup.
If something goes wrong
| Problem | What it means | What to do |
|---|---|---|
| You are not an admin in Meta | The account lacks the required access | Ask a Meta admin to complete the flow or grant the needed permission |
| The number is already connected elsewhere | The number is not available for a fresh connection | Use the migration guide or disconnect the existing integration first |
| The connection popup closes early | The final Meta confirmation did not finish | Restart the connection flow and complete it through Finish |
| The verification code does not arrive | Delivery may be delayed or the wrong method was selected | Confirm the verification method and check the email inbox used during sign-up |
| The platform shows a retry state | The setup did not complete cleanly | Retry the connection from the integration flow |
WhatsApp policy note
Some business types and message categories are restricted or prohibited by Meta, especially in regulated or sensitive industries. Review the official WhatsApp Business Messaging Policy before completing setup if that applies to your business.
Common blockers include:
- Products or services linked to gambling, betting, or games of chance.
- Alcohol, tobacco, weapons, or other age-restricted products.
- Certain financial services, loans, high-risk investments, or debt collection use cases.
- Medical, health, or personal data use cases that do not clearly meet Meta policy.
- Misleading business names, display names, or websites that do not match the business identity.
INFO
Meta makes the final policy decision. If your business is in a regulated category, review the policy before setup and prepare supporting business information.